
Update 2023:
TipTap now has offical extension for LaTeX.
------
In this guide we will create a math input component for tiptap.
tiptap is a headless wrapper around ProseMirror – a toolkit for building rich text WYSIWYG editors, which is already in use at many well-known companies such as New York Times, The Guardian or Atlassian.
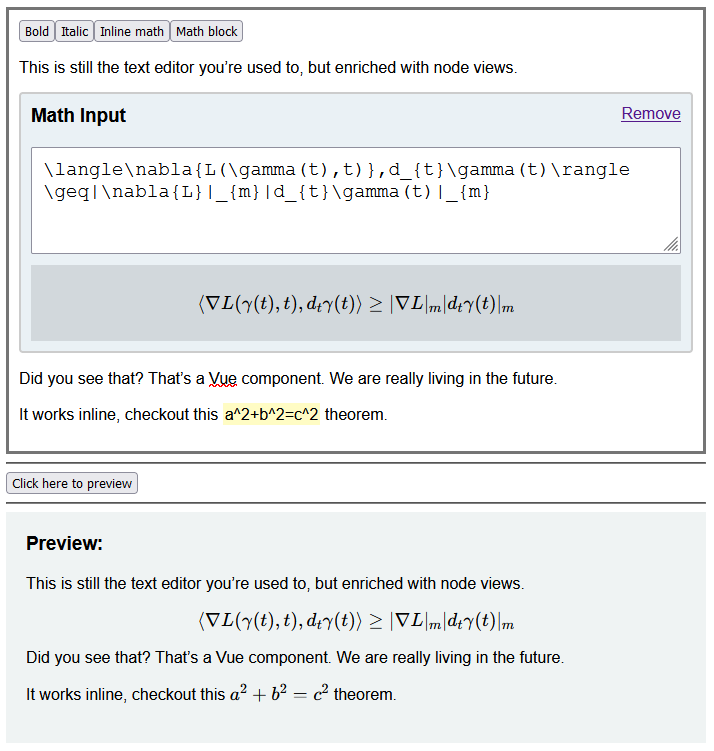
Here's a picture of the finished editor project, a node view made as a Vue component, containing textarea for TeX input and a div with rendered preview.
 Project setup
I'll start with a default Vue 2 project created with Vue CLI.
Next I'll add tiptap Vue component with the starter kit.
yarn add @tiptap/vue-2 @tiptap/starter-kitWe're going to use KaTeX to render out LaTeX typesetting.
KaTeX is a fast, easy-to-use JavaScript library for TeX math rendering on the web.
KaTeX is compatible with all major browsers, including Chrome, Safari, Firefox, Opera, Edge, and IE 11.
KaTeX supports much (but not all) of LaTeX and many LaTeX packages.
yarn add katexNow when we run yarn serve, we have our app up and running.
Writing the component
Let's create our node view with Vue following the tiptap guide.
First we create the component, let's call it FormulaComponent.vue. In template section we are going to use the following code.
<template>
  <node-view-wrapper>
      <div class="katex-component" :class="{'is-selected': selected}">
          <div class="katex-component__title">
            <h3>Math Input</h3>
            <a href="#" @click.prevent="deleteNode">Remove</a>
          </div>
          <textarea rows="3" v-model="rawFormula"></textarea>
          <div class="katex-component__formula" v-html="renderedFormula"></div>
      </div>
  </node-view-wrapper>
</template>
This contains our textarea in which we are going to input our LaTeX math formula, a link to remove the node and a div with the rendered formula.
Next our script section looks like this.
import { NodeViewWrapper, nodeViewProps } from '@tiptap/vue-2'
import katex from 'katex';

export default {
  components: {
    NodeViewWrapper,
  },
  props: nodeViewProps,
  data() {
    return {
      rawFormula: this.node.attrs.content,
      options: {
        throwOnError: false,
        strict: false,
        displayMode: true,
        maxSize: 300
      }
    }
  },
  watch: {
    rawFormula(newVal, val) {
      if (newVal == val) {
        return;
      }

      this.updateAttributes({
        content: newVal,
      })
    }
  },
  computed: {
    renderedFormula() {
      if (!this.rawFormula) {
        return '';
      }

      return katex.renderToString(this.rawFormula, this.options);
    }
  }
}
Our data contains raw formula string that we initially pull from the content attribute of our custom tag.
Then we have options that will contain our options object for katex configuration.
We will assign a watcher to our rawFormula variable that will update the content attribute of our node.
And at last we have an computed property called renderedFormula that will actually call katex to render the given LaTeX text.
Next we need to create a prosemirror schema.
import { Node, mergeAttributes } from '@tiptap/core'
import { VueNodeViewRenderer } from '@tiptap/vue-2'
import Component from './FormulaComponent.vue'

export default Node.create({
  name: 'formulaComponent',

  group: 'block',

  addAttributes() {
    return {
      content: {
        default: '',
        renderHTML: attributes => {
          return {
            content: attributes.content
          }
        }
      }
    }
  },

  parseHTML() {
    return [
      {
        tag: 'katex',
      },
    ]
  },

  renderHTML({ HTMLAttributes }) {
    return ['katex', mergeAttributes(HTMLAttributes)]
  },

  addNodeView() {
    return VueNodeViewRenderer(Component)
  }
})
As referenced previously we are going to need an attribute that will hold our LaTeX text called content.
Our parse and render methods are going to use custom tag called <katex>.
So final node HTML is going to look like this.
<katex content="\langle\nabla{L(\gamma(t),t)},d_{t}\gamma(t)\rangle\geq|\nabla{L}|_{m}|d_{t}\gamma(t)|_{m}"></katex>Next we need a way to add our node from the editor. To do this we need to create a command that will insert the node at the current cursor position.
Add the following to our schema.
addCommands() {
  return {
    addKatex: (attrs) => ({state, dispatch}) => {
      const { selection } = state
      const position = selection.$cursor ? selection.$cursor.pos : selection.$to.pos
      const node = this.type.create(attrs)
      const transaction = state.tr.insert(position, node);

      dispatch(transaction);
    }
  }
}
Using marks for inline math
For inline math formula rendering we're just gonna create a simple mark extension. It's just gonna create a <span> tag with data-inline-katex attribute so we can reference it later.
import { Mark, mergeAttributes } from '@tiptap/core'

export default Mark.create({
    name: 'formulaMark',

    excludes: '_',

    spanning: false,

    parseHTML() {
        return [
            { tag: 'span[data-inline-katex="true"]' },
        ]
    },

    renderHTML({ HTMLAttributes }) {
        return ['span', mergeAttributes(HTMLAttributes, {'data-inline-katex': 'true'}), 0]
    },

    addCommands() {
        return {
            setFormulaMark: attributes => ({ commands }) => {
                return commands.setMark(this.name, attributes)
            },
            toggleFormulaMark: attributes => ({ commands }) => {
                return commands.toggleMark(this.name, attributes)
            },
            unsetFormulaMark: () => ({ commands }) => {
                return commands.unsetMark(this.name)
            },
        }
    },
})
Calling commands from editor
For the actual editor we're going to follow the steps from the tiptap docs.
The template is going to have our buttons that will run the commands we created.
<button type="button" class="btn-editor" @click="editor.chain().focus().toggleFormulaMark().run()">
	Inline math
</button>
<button type="button" class="btn-editor" @click="editor.chain().focus().addKatex().run()">
	Math block
</button>
Displaying the resulting HTML
To display our block level math we're going to select all katex elements and tell katex to render it.
document.querySelectorAll('katex').forEach(el => {
  katex.render(el.getAttribute('content'), el, {
    throwOnError: false,
    strict: false,
    displayMode: true,
    maxSize: 300
  });
})
And to render our inline mark, we're just going to use katex render method with displayMode: false option.
document.querySelectorAll('span[data-inline-katex]').forEach(el => {
  katex.render(el.innerText, el, {
    throwOnError: false,
    displayMode: false
  });
});
Summary
Check out the full source code here, and online demo here.
You should check similar packages in this space.
MathQuill - Type math directly in your browser.
MathJax - Math typesetting similar to Katex.
Prosemirror Math - Really detailed math schema for Prosemirror.