
I'm going to start with the fresh Laravel installation. You should also check prerequisites of packages we are going to use.
Code for this project is available here.
Database and package setup
You need some kind of database to store user push subscription information. In this case I'm using SQLite3 since it's the simples to setup.
You can skip this step if you already have database ready to use.
First I'll pull the required packages.
sudo apt update
sudo apt-get install sqlite3 php8.1-sqlite3 php8.1-gmp
sudo service php8.1-fpm restart
Then I will create a new file in database/ folder.
touch database/database.sqliteThe last thing is to update my .env file.
DB_CONNECTION=sqlite
DB_DATABASE=/var/www/push-project/database/database.sqlite
DB_FOREIGN_KEYS=true
Laravel support multiple notification drivers. You can find them all here. We are going to use web push driver, let's pull it into our project.
composer require laravel-notification-channels/webpushNow we need to run a command that will generate migrations and add VAPID keys to our .env file. VAPID keys are used by push server to identify your server.
php artisan vendor:publish --provider="NotificationChannels\WebPush\WebPushServiceProvider" --tag="migrations"
php artisan webpush:vapid
Next let's run migrations and then seed the database with some test users.
php artisan migrate
php artisan db:seed
Backend code and manager endpoints
In this part we're going to add our controller with some default methods we need and update our model with code for handling user push subscriptions.
You can use any model you want, in this case we are going to use already existing User model.
use Illuminate\Notifications\Notifiable;
use NotificationChannels\WebPush\HasPushSubscriptions;

class User extends Authenticatable
{
	use HasApiTokens, HasFactory, Notifiable, HasPushSubscriptions;

	...
}
Next we need a controller that will handle our subscriptions.
php artisan make:controller NotificationManagerControllerOpen the newly created file app/Http/Controllers/NotificationManagerController.php.
We need two methods to handle our user push subscriptions, one for subscribing and one for unsubscribing. Luckily the trait we added to our user model has methods to handle this actions.
class NotificationManagerController extends Controller
{
    public function subscribe(Request $req)
    {
        $user = User::find(1);

        $subscription = $user->updatePushSubscription(
            $req->post('endpoint'),
            $req->post('public_key'),
            $req->post('auth_token'),
            $req->post('encoding'),
        );

        return response()->json(['message' => 'Subscribed!']);
    }

    public function unsubscribe(Request $req)
    {
        $user = User::find(1);

        $user->deletePushSubscription($req->post('endpoint'));

        return response()->json(['message' => 'Unsubscribed!']);
    }
}
Don't forget to register your routes
Route::post('/notifications/subscribe', [NotificationManagerController::class, 'subscribe']);
Route::post('/notifications/unsubscribe', [NotificationManagerController::class, 'unsubscribe']);
Frontend implementation
First we need to create and register our service worker.
Service workers essentially act as proxy servers that sit between web applications, the browser, and the network (when available). They are intended, among other things, to enable the creation of effective offline experiences, intercept network requests and take appropriate action based on whether the network is available, and update assets residing on the server. They will also allow access to push notifications and background sync APIs.
So in short:
We need to create javascript file and register it as a service worker
Ask user for notification permission
Get the subscription from the browser and save it in our database
Let's create a file in our public directory called sw.js which will be our service worker.
"use strict";

self.addEventListener("install", function(event) {
    self.skipWaiting();
});

self.addEventListener("activate", function(event) {
    event.waitUntil(self.clients.claim());
});

self.addEventListener("push", function(event) {
    if (!(self.Notification && self.Notification.permission === 'granted')) {
        return;
    }

    const payload = event.data ? event.data.json() : {};
    event.waitUntil(self.registration.showNotification(payload.title, payload));
});
Now we need to register it, we can do that in our main javascript file. Let's name this file main.js and put it in our public/js path.
if ("serviceWorker" in navigator) {
    window.addEventListener("load", function() {
        navigator.serviceWorker.register("/sw.js");
    });
}
Since we're already in our main.js file, we are going to add this helper method which will convert our VAPID key to ArrayBuffer.
function urlBase64ToUint8Array(base64String) {
    var padding = "=".repeat((4 - (base64String.length % 4)) % 4);
    var base64 = (base64String + padding).replace(/\-/g, "+").replace(/_/g, "/");

    var rawData = window.atob(base64);
    var outputArray = new Uint8Array(rawData.length);

    for (var i = 0; i < rawData.length; ++i) {
    	outputArray[i] = rawData.charCodeAt(i);
    }

    return outputArray;
}
Now let's create subscribe method that will POST subscription data to our backend and save it. In this example I'm using Fetch API to make HTTP requests, you can use also use the included axios library.
function subscribe(sub) {
    const key = sub.getKey('p256dh')
    const token = sub.getKey('auth')
    const contentEncoding = (PushManager.supportedContentEncodings || ['aesgcm'])[0]

    const data = {
        endpoint: sub.endpoint,
        public_key: key ? btoa(String.fromCharCode.apply(null, new Uint8Array(key))) : null,
        auth_token: token ? btoa(String.fromCharCode.apply(null, new Uint8Array(token))) : null,
        encoding: contentEncoding,
    };

    fetch('/notifications/subscribe', {
        method: 'POST',
        headers: {
            'Content-Type': 'application/json',
            'X-CSRF-TOKEN': csrftoken
        },
        body: JSON.stringify(data)
    })
    .then(response => response.json())
    .then(data => {
        console.log('Success:', data);
    })
    .catch((error) => {
        console.error('Error:', error);
    });
}
Next let's create a function that will initiate notification request from browser and call our subscribe method. Here you will need to enter VAPID public key which you can find in your environment.
const VAPID_PUBLIC_KEY = 'your-key';

function enablePushNotifications() {
    navigator.serviceWorker.ready.then(registration => {
        registration.pushManager.getSubscription().then(subscription => {
            if (subscription) {
                return subscription;
            }

            const serverKey = urlBase64ToUint8Array(VAPID_PUBLIC_KEY);

            return registration.pushManager.subscribe({
                userVisibleOnly: true,
                applicationServerKey: serverKey
            });
        }).then(subscription => {
            if (!subscription) {
                alert('Error occured while subscribing');
                return;
            }
            subscribe(subscription);
        });
    });
}
Unsubscribe method is really simple, we just find the endpoint of existing subscription and send it to our backend endpoint.
function disablePushNotifications() {
    navigator.serviceWorker.ready.then(registration => {
        registration.pushManager.getSubscription().then(subscription => {
            if (!subscription) {
                return;
            }

            subscription.unsubscribe().then(() => {
                fetch('/notifications/unsubscribe', {
                    method: 'POST',
                    headers: {
                        'Content-Type': 'application/json',
                        'X-CSRF-TOKEN': csrftoken
                    },
                    body: JSON.stringify({
                        endpoint: subscription.endpoint
                    })
                })
                .then(response => response.json())
                .then(data => {
                    console.log('Success:', data);
                })
                .catch((error) => {
                    console.error('Error:', error);
                });
            })
        });
    });
}
Our view code is really simple. First we need to add our csrf-token meta tag so we can send it with our HTTP requests. Next we reference our javascript file and create buttons that will handle our events.
<!DOCTYPE html>
<html>
  <head>
    <meta charset="utf-8">
    <meta name="csrf-token" content="{{ csrf_token() }}">
    <title>Web Push Demo</title>
  </head>
  <body>
	<button id="enable-push">Enable push notifications</button>
    <button id="disable-push">Disable push notifications</button>
    <script src="/js/main.js"></script>
  </body>
</html>
Please not that Notification API is not supported in all browsers.
Biggest problem, at the time of the writing, is that there is no way to get web push notifications on iOS devices. Although that is hopefully going to change in the future.
Update (2023-05-15):
Supported on iOS Safari since version 16.4.
Browser | Windows PC | macOS | Android | iOS |
|---|---|---|---|---|
Firefox | ✅ | ✅ | ✅ | ❌ |
Chrome | ✅ | ✅ | ✅ | ❌ |
Safari | ❌ | ✅ | ❌ | ✅ |
Microsoft Edge | ✅ | ✅ | ✅ | ❌ |
Opera | ✅ | ✅ | ✅ | ❌ |
Samsung Internet Browser | ❌ | ❌ | ✅ | ❌ |
Internet Explorer | ❌ | ❌ | ❌ | ❌ |
Creating and sending our first notification
We can create new notification by using artisan console.
php artisan make:notification NewUserActivityThis will create a new class in app/Notifications. Update it with the following.
<?php

declare(strict_types=1);

namespace App\Notifications;

use Illuminate\Bus\Queueable;
use Illuminate\Notifications\Notification;
use NotificationChannels\WebPush\WebPushChannel;
use NotificationChannels\WebPush\WebPushMessage;

class NewUserActivity extends Notification
{
    use Queueable;

    public function via($notifiable)
    {
        return [WebPushChannel::class];
    }

    public function toWebPush($notifiable)
    {
        return (new WebPushMessage())
            ->title('Welcome to the application')
            ->body('This is notification body content. You are successfully subscribed!');
    }
}
Next we are going to add new method to our NotificationManagerController class that will send our notification.
use App\Notifications\NewUserActivity;
public function send()
{
$user = User::find(1);
$user->notify(new NewUserActivity());
return redirect('/');
}
// Also don't forget to register new route
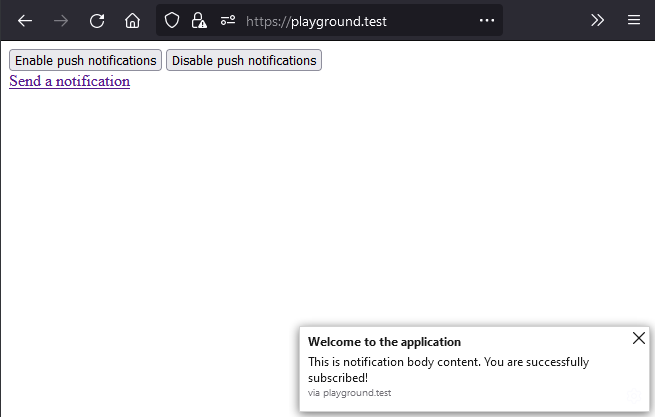
Route::get('/notifications/send', [NotificationManagerController::class, 'send']);Now when we visit /notifications/send you should see your new notification.
Here's how it looks in firefox.
 If you need some help, you can check out the code for this project.